
Back in 2005, when we had the wacky idea to launch the Build-A-Bike® team-building activity, we had no idea how massive the charity bike-building industry would become. At the time, it was a brand-new concept. Small teams competed in fun challenges to earn bicycle parts, then assembled those parts into new bikes for local kids.
The participants had a blast, sponsoring companies developed teamwork and communication skills, and local charities received valuable donations—a true win-win-win outcome.
Over the last 20+ years, we’ve facilitated bike builds for thousands of corporate groups. We’ve tried just about everything: some ideas were fantastic, while others were miserable failures. If you are organizing your very first bike-building event, this guide will help you learn from our experience and avoid costly mistakes.
So we created this “build-a-bike team-building activity instructions” guide to help! The five steps below will help you create a fun, interactive, high-energy bicycle charity event.
Before you start, though…
Crucial Decision Before You Start: Team-Building Activity vs. CSR Activation.
When people organize a “Charity Bike Build”, there are two totally different versions that often get muddled together. And this is really, really, really (did I say that enough times?) important to understand if someone has asked you to organize one.
*** Mixing these up is the #1 mistake first-time organizers make. ***
Bike Team Building Activity
A bike team-building activity is an organized event in which the entire group participates simultaneously. These are high-energy activities that typically take about an hour. These activities are best when you want an entire group to participate and build toward a crescendo. These activities focus on building teamwork and morale. The donation is just the end result of the activity.
- One (or two) bikes per team (typically six to eight people).
- Each team works together to earn the bike parts.
- Teams interact with each other as well, so there are natural networking opportunities.
- There is a set timeframe, so they are easy to insert into an agenda.
- The bigger the group, the more impactful the activity.
- Creates a sense of unity across the whole group.
CSR Activation
A CSR Activation is typically a come-and-go station where volunteers build bikes one at a time, often throughout the day or during a meeting. This type of activity focuses on the donation. These are popular for give-back days where there is no formal meeting.
- One bike per volunteer or two.
- CSR Activities take up less space.
- They also don’t need much supervision. (Just someone to safety-check the bikes afterward.)
- You can easily fit them into an already full schedule or agenda.
- CSR Activations are often more expensive because you’ll need about 4X as many bikes.
- The big downside, though, is that you lose the “building teamwork” part of the activity. Teams of one or two people are working independently.
Both the bike team-building activity and CSR events have strengths and weaknesses. The main thing to understand when you are organizing a charity bike build is to not accidentally organize one when the other would have been a better choice.
For instance, the Dallas Stars hockey club organized a bike build for their fans after the team made the playoffs (above). Forcing a bunch of random fans to do team exercises together would have been odd, but the CSR activity was fantastic (pun intended). Or organizing CSR activities at corporate annual meetings would also be a missed opportunity. Having the whole company in a huge ballroom working together would create a very memorable experience and teamwork. So, the bike team-building activity is a better fit.
Step #1: Here Are the Materials You Will Need for a Bicycle Team Building Event
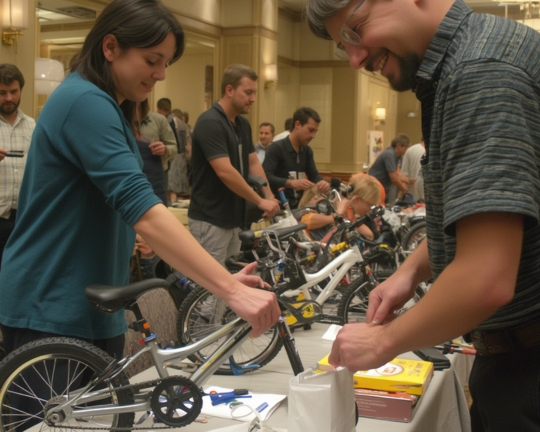
If you want to source the materials for a charity bike build yourself, you’ll need bicycles, helmets, and the tools needed to build each bicycle type that you order. You may also want to add items like tire pumps, bike locks, foot pegs, or other additional items. However, many of these additional items had unintended consequences when we added them to our events.
In those first couple of years, when we were facilitating Build-A-Bike® activities, we bought bikes individually for each child the charity identified for us. It was unbelievably time-consuming. It also created problems we didn’t see coming.
One of our first events included kids ages 5 to 13. The first problem was that different-sized bikes required different tools. The smaller bikes had training wheels. Some of the larger bikes had gears. Others had handbrakes. Some had both.
So the teams with the easy bikes finished way earlier. And some of the teams with the complicated bikes actually got angry. They felt like the other teams had an advantage.
The donation itself had a similar problem. The 6- to 8-year-old kids were in heaven. They smiled and thanked the teams, and the teams took photos with their kids. It was perfect. But many of the younger kids had never ridden a bike, so they were nervous and less excited. And the teenagers were gracious, but they seemed uncomfortable.
My point is that in our attempt to serve different age groups, we created dramatically different outcomes for the different teams. Over time, we identified the best bike team-building materials for the most consistent results.
Suggested Materials for Charity Bike Builds.
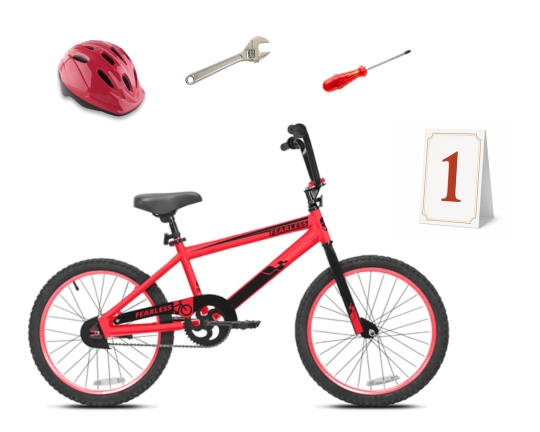
For charity team activities, you’ll need one of the following for every eight people in your group. (Example: If your group size is 40, you’ll probably want five or six of each of the following.) We suggest a minimum of four bikes. Otherwise, the donation can be anticlimactic. For CSR Activations, you’ll want one of each for every two to three volunteers that you expect.
- 20″ Unisex Coaster Bicycle (perfect for 6- to 8-year-old kids)
- S/M Bicycle Helmet (perfect for 6- to 11-year-old kids)
- Adjustable Wrench, Phillips Screwdriver. (These are all the tools you’ll need for coaster bikes. But if you purchase different types of bicycles, they will need different tools!)
- An activity for the group to earn their bike. (Not needed for CSR Activations)
- A Table Tent with a Team Number for Each Team Table. (Not needed for CSR Activations)
Coaster bikes are bikes without handbrakes and without gears. (The kids turn the pedals the opposite way to stop.) We suggest these types of bicycles because they are easy for even the least mechanically inclined team member to assemble.
They are also easy to safety check. If you happen to order bicycles with gears or handbrakes, you’ll likely encounter a few situations where a team strips the brake-line wire or accidentally disassembles the brake. These more complicated bicycles just have more risk involved. You’ll also need additional tools. So, for bike build activities, simple is better.
Accessories You Can Add, But We Recommend Against.
- Bike Locks: If you have extra budget, a great bike lock is a fantastic addition. However, the good ones aren’t cheap. They’ll add $50-$100 per bike to the activity cost. They are also heavy, so they will add to the shipping cost as well. If you do add a bike lock to the donation, don’t add in a cheap one. (Your team members will notice.)
- Tire Pumps: Similar to the bike locks, a tire pump is a great addition. But through experience, for some reason, when we give teams the tire pumps, they somehow damage the bike innertubes. I’ve been doing bicycle team building for over 20 years, and I still can’t figure out how they do it. But mark my words. If you give 10 bike-building teams an air pump, one of those 10 bikes will end up with a ripped tube stem.
- Foot Pegs: Foot pegs are fantastic! They are fairly inexpensive, and the kids love them. But if you purchase different kinds of bicycles and some have foot pegs and others don’t, when you donate them to real kids, some of the kids will be disappointed. So, make sure all the bikes have them, or none of them do.
Step #2: How Much Space You Will Need and Venue Set Up.
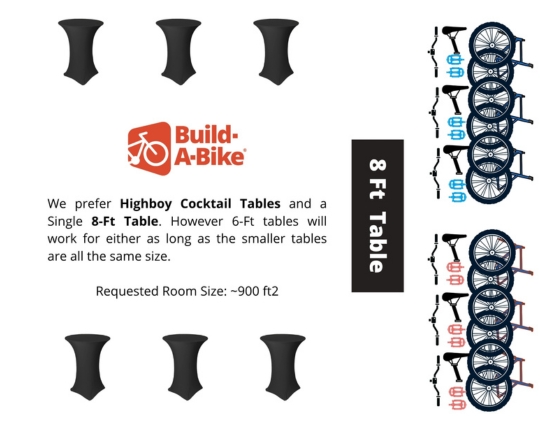
For Team-Building Events
- Space Needed: Plan for roughly 175 square feet per team.
- Layout: Place team tables far enough apart for movement. Set up a central supply table between the teams and the bike parts area. Judges or facilitators stand behind the table to hand out earned parts.
For CSR Activations
- Storage Consideration: Boxed bikes don’t take up much room, but fully assembled bikes expand rapidly. Reserve extra floor space for finished bikes.
- Space Needed: Plan for roughly 20–30 square feet per station.
- Layout: Set up tables with assembly instructions, safety checklists, and charity info.
Step #3: Tips for Organizing the Charity for Your Bike Build.
Target local Boys & Girls Clubs or YMCA after-school programs. They often serve kids ages 6 to 8 and usually have vehicles that can transport finished bikes.
Keep in mind that the event is designed to HELP THE KIDS, and these poor charities are always understaffed and underfunded. So, they may not be able to fulfill your every request. Try not to be too demanding. If they can bring kids to your event, that is fantastic! If they can’t, though, it won’t affect how your team feels about the activity. Just be flexible.
Charity Outreach Tips
- Call the Chapter Director directly.
- Start with the donation, not the logistics: Say, “I work with [Company], and our team wants to make a donation to your club. Do you have around [X] kids who could use brand-new bicycles?”
- Keep logistics simple: These organizations are understaffed. If they can bring children to accept the bikes at the end of your event, it creates a memorable climax. If they can’t, don’t press—simply arrange drop-off.
Step #4: Facilitating the Charity Bike Build.
Remember, the goal is to build your team. The bike is just the outcome that you create from the process. Here is a good outline with suggested time frames for each part.
- 0:00 – 0:05 | Welcome & Theme Intro: Introduce the facilitator, outline the goal, and connect the activity to company values.
- 0:05 – 0:15 | Icebreaker Exercise: Run one short activity to break the ice (e.g., Crazy Handshakes or Space Counting). Avoid stacking games—too many back-to-back games kill momentum.
- 0:15 – 0:20 | Team Formation: Assign tables or let an icebreaker naturally scatter participants into balanced teams. Have each team create a team name.
- 0:20 – 0:50 | The Challenge (Earning Parts): Teams complete collaborative challenges or problem-solving tasks to earn their wheels, handlebars, seats, and tools. Avoid trivia questions. Use physical puzzles, communication challenges, or resource-sharing tasks that require full-team cooperation.
- 0:50 – 1:05 | Bike Assembly & Safety Inspection: Teams assemble their bikes. Facilitators perform a strict mechanical check on handlebars, pedals, and tire pressure.
- 1:05 – 1:15 | Charity Reveal & Presentation: Present the bikes to charity representatives or the children directly.
Step #5: Getting the Completed Bikes to Your Local Charity Partner.
Finally, you’ll need to arrange transportation for the bikes from the venue to the charity. Keep in mind that getting the bikes to the venue is fairly easy if they are in boxes. Assembled bikes, though, take up more space and are more challenging to transport. For instance, 20 unassembled bicycles fit on a single pallet or easily into a standard pick-up truck. But assembled bicycles take up twice as much space. You may need a cargo van or box truck to deliver the bicycles to the charity.
Make sure to anticipate the extra transportation cost when you create your event budget. Otherwise, you can be left with a costly surprise at the end!
Order Official Build-A-Bike ® Bikes and Helmets
If you’re looking for something more turnkey, we can do a lot of the “heavy lifting” for you. Our instructor can organize your entire activity from start to finish! We handle all the ordering, logistics, setup, facilitation, and takedown of the whole process. We’ll also organize the charity and the bike delivery for you. It’s the easiest (and often the cheapest) way to guarantee your team will experience a five-star bike build!
 Or You Can Order DIY Kits for just $1400 + Shipping (Serves up to 32 People)